In the previous post and the post before I showed how I repair my models before they’re ready to print. The final step is actually uploading the model to Shapeways. This happens to be the most exciting part since it will tell you if there are any flaws in the final model.
I already had a lot of problems repairing the model and had to remove a small piece of it to make it manifold. But there are other problems that might occur when uploading a model to Shapeways. One of the more annoying things are loose parts that are too small to notice immediately. However, those very small parts might prevent the model from being printed because they’re smaller than the minimum bounding box. And you have to pay extra for multiple parts so you just don’t want those small, loose parts!

And as I said, it has some very small, loose parts! These are actually caused by the chosen hair style, which seems to have strands of hair flying around her head.
It would have been nice if Shapeways had a feature to remove these loose parts but all it does is tell me how large they are. One main part of 12.4×7.6×25/5 cm and three parts that are smaller than a tenth of a cubic millimeter. Those are the ones that prevent this model from being printed successfully!
So at this point I should actually fix this by choosing a different hair style. But I will use the MeshMixer trick again of separating all shells and then just remove all parts that seem too small to use. All small parts would already be too small to really get noticed so removing them won’t have much effects. Well, except in Shapeways, where the removal of the small pieces will hopefully result in a printable model.

Uploading to Shapeways is a slow process which can take minutes before it is done. And even after the file is uploaded, it could still take some time before it is completely ready to be printed. But it is needed so Shapeways will show me where the loose parts are that need to be removed. To do so, I need give Shapeways to render the image for me that will display them for me. And one part is on her left front and the other two on her left back side of her head.
But it is easier to remember that I should not use this hairstyle for 3D models in the future. But for now, I will just try to fix this model without going back to Poser.
So, how do I fix this? Simple. I will go back to OpenSCAD and adjust the floor panel. I then import it again in Poser and give it the exact size and position as the old version. I will then change Anarani’s hair to a better hairstyle and go through the whole process again. And while it sounds like a lot of works,once you’ve done these steps over and over again, it becomes about half an hour work, including the time needed to wait for the system to render or calculate things. I won’t create a new artistic rendering, though. But the new model will be uploaded to Shapeways.
And once the upload was successful, I started noticing that the strings of her bikini top weren’t very visible in Shapeways. So, as the last fix for this model, I removed her top. The result was finally printable!

But the wall thickness is still a reason for the model to be rejected. Fortunately you can specify that you wanted it printed anyways when you order it, thus it will be printed. Problem is that it has some risky areas that might not print well. In this case, the skirt, the scarf and the hair will cause trouble.
A price has also been calculated. Including taxes, this model will cost me $101.86 if I want it. Right now, my budget prevents me from buying it, though.When 3D printing is a hobby, make sure you have a budget set aside for the amount that you can spend on these prints, else you’ll end up broke before you know it!
The price is reasonable for such a large figurine. Do keep in mind that it’s over 25 cm tall! I did save on the price by having the other two dimensions as short as possible, thus conserving machine space. I also made it hollow, which also reduces the costs. But the container for my device is still very large.

Machine space is one important factor when printing in white plastic. The system is calculating a small, extra area around the model that would be off-limits for other printed items. When the model gets printed together with other objects, this space is important to make sure no two models get fused together! But the price of the model is based on the volume of the model and the machine space needed.
Now, the objects with the smallest machine space would be a sphere. Thus, the round shape of the box is saving me some space, even though it is big. It is actually the back panel that adds extra machine space, since the area between the panel and the model is added into the math.
Fortunately, they do calculate it very precise and at one point, the space between back panel and model is wide enough to allow a hole, else it would have been a bit more expensive. But Shapeways will tell you how much space it actually needs.
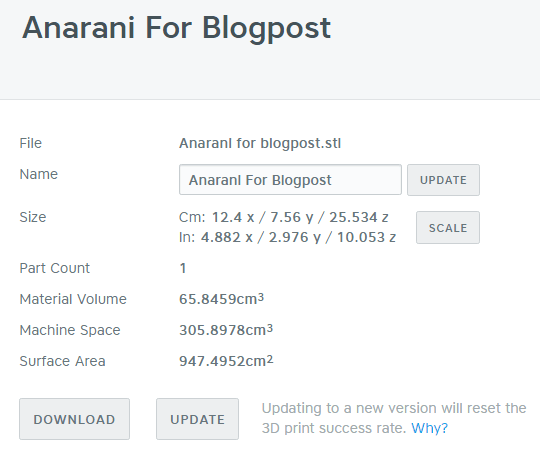
Because I made a hollow mode, the material volume is quite low! White plastic costs $0.28 per cm³, thus this is only $18.44.
But the space costs $0.21 per cm³ and that adds up to $64.24. Add $1.50 for the start price for a single part print and I have a total of $84.18 excluding taxes. Taxes are 21% so the total price according to my calculations is $101.86.
So, what makes the 3D print so expensive? Mostly machine space, although that can be reduced by avoiding space-wasting areas in your model. Here, removal of the back panel should have saved me a bit of space. The space between her arms and legs are also added so because she’s standing on a plateau and holding an object, two ‘rings’ of print material are created and the space inside that ring is added to the material volume.
Put the legs wider apart could have saved some machine space, if it would be wide enough to allow a hole through the leg-ring. The same applies to her arms.
This model would actually cost $63.38 if I would print it in sandstone since you only pay for the material volume in sandstone. Sandstone does cost $0.75 per cm³ but because the model is hollow, that would basically be that 65 cm³. So it would be great to have it printed in sandstone, except for one major problem… Sandstone requires thicker materials. Supporting walls must be at least 2 mm and unsupported walls have to be even thicker!
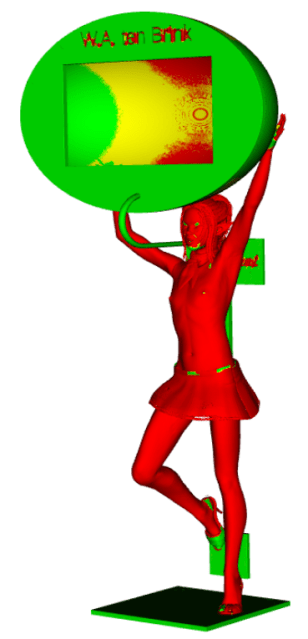
The heatmap of wall thickness shows how much of the model is at risk of failing when printed in sandstone. In this case, almost the whole Anarani part. The box itself also has areas that are too thin. Only the back panel seems to be strong enough!
Would other materials be an option? Considering the large size of the model, most materials would not qualify because the model is too big for the printers to handle. Metallic plastic would be an option but then you still pay for material volume and this plastic is more expensive than white plastic. $164.87 is quite a lot.
Frosted Ultra Detail is another option but even more expensive at $284.11 so I won’t even consider that as an option.
Stainless steel is an option but like sandstone, it has too many thin areas so it won’t print in the end. And for the other materials, the model is just too big…
I have created Poser models in colored sandstone, though. But these models are solid and I had to be real careful to avoid any thin parts. Especially hair and fingers turn out to be vulnerable. And the model needs to be strong enough to carry it’s own weight and is extremely vulnerable when it is just printed since the sandstone is still soft. Like the wet sand that’s used to make sandcastles.
