In the earlier post I created a ruler so I can make sure that my box will have the exact size that I have specified. As I said, Poser loses this information, forcing me to fix the scale of the export file once I’m done with the model in Poser.
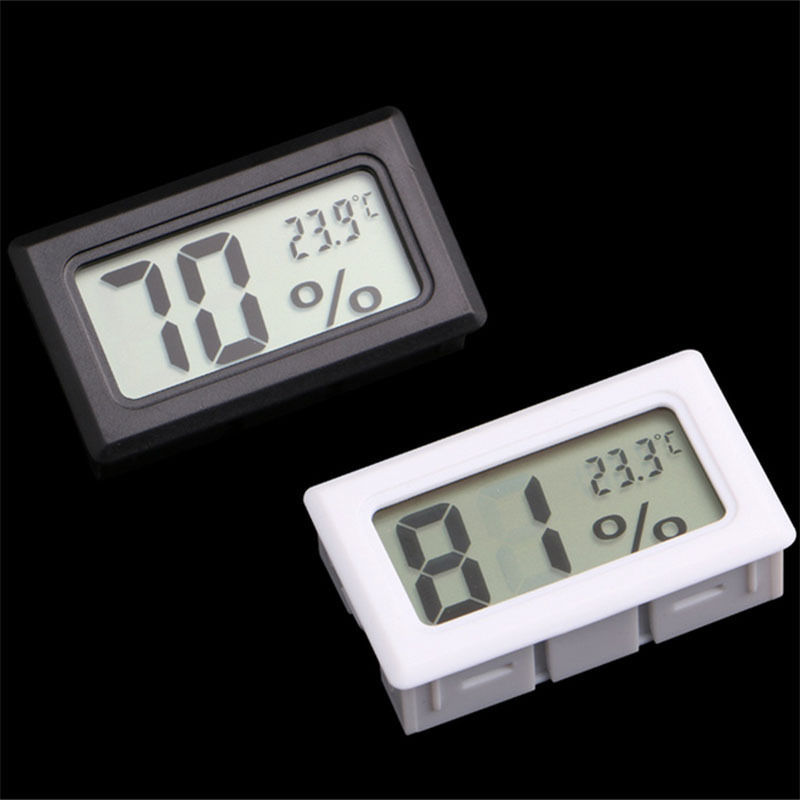
The device I will use is this thermometer that’s also shown on the left. (Image from AliExpress.) And the first thing I will have to do is measure it to get the exact dimensions. This is tricky because if you get the dimensions wrong, it either won’t fit or will be too loose to fit.
AliExpress does mention the size (3 cm x 4.8 cm x 1.6 cm) but these turn out to be incorrect! So, never assume the site will have exact measurements! Worse, this device has a small border that’s slightly bigger than the case itself, allowing a nice fit, but I need the size of the box, not the border. So, I take my ruler and start measuring the box. I end up with 45.75 mm x 25.9 mm x 13.5 mm. So, that’s the shape I need in OpenSCAD, which I will subtract from the real container.
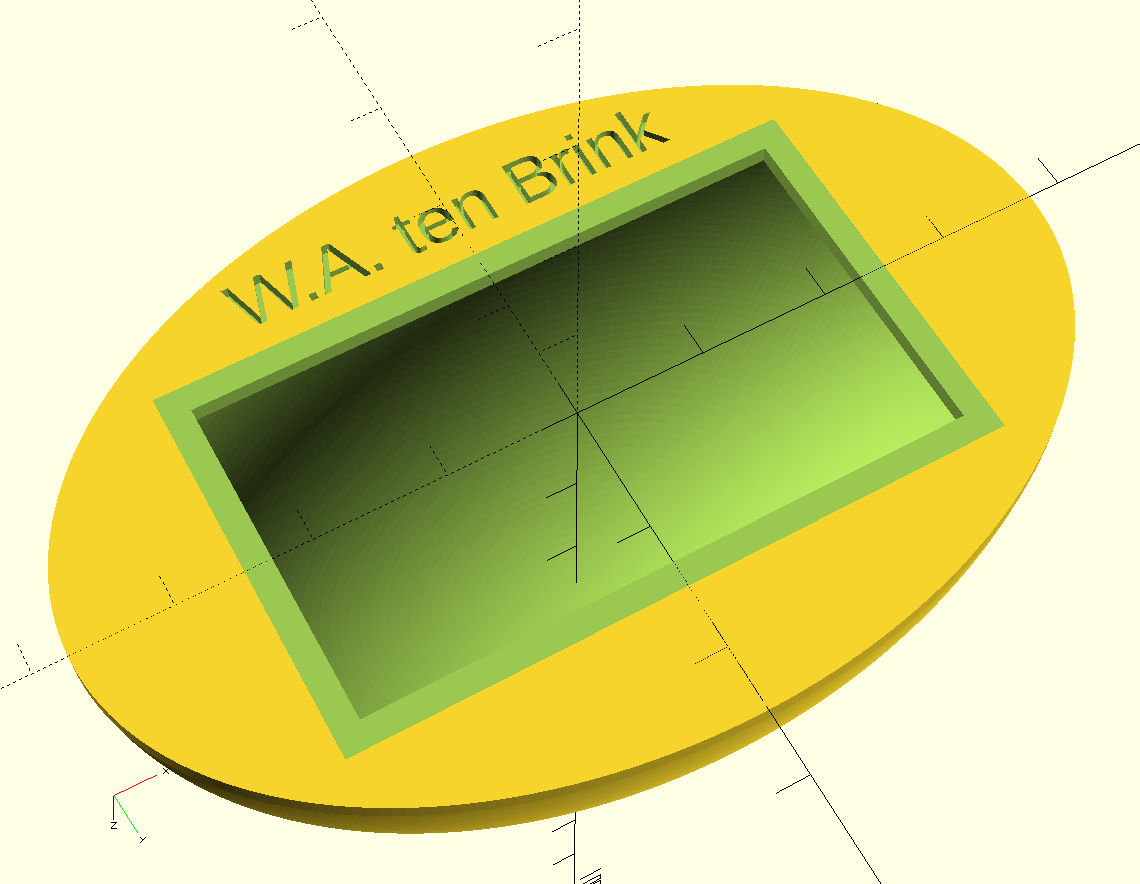
The container itself needs to be hollow and must have enough space to contain the device. And for this one, I want a container that is round. That adds more complexity but it will look better. And I want my name on it, so people know it’s mine!
Making this shape isn’t difficult but you need to play around a bit. I did create the clock as a block to subtract from my shape and I did this to make sure that it fits. Especially the back should not have any holes from the corners of the device, otherwise, it won’t fit.
However, to create these oval shapes in OpenSCAD you need to create a round cylinder and a round sphere and then resize the width, height and depth to the required dimensions before subtracting the box. This slows down the rendering slightly, especially if you use high details.
And in the top of my script I use ‘$fn=250;’ which sets the detail level to a reasonable level. Simply put, OpenSCAD can’t create round shapes but can make a close estimate by using triangles and squares in a curve. With a value of 6, my shape would actually be a six-sided model. With 250, the round shape is actually made of 250 small, flat panels. Since I’ve set it to be 75 mm wide, those panels will be barely noticeable. Do keep in mind that the 3D printer won’t be able to make round shapes either so the value of 250 will be small enough to match the print resolution of Shapeways. But if you polish it, the shape will become more round.
Now, the script:
$fn=250;
module Box(){
  translate([-23, -13, 0]) union(){
    difference(){
      union(){
        translate([0, 0, 0]) cube([46, 26, 14]);
        translate([-2, -2, -2]) cube([50, 30, 2]);
      }
      union(){
        translate([23, 13, -0.1]) rotate([180, 0, 0]) linear_extrude(height = 2) {
          text("12:30",
          size = 10,
          font = "Lucida Console Regular",
          halign = "center",
          valign = "center"
        );
        } // text
      } // union
    } // difference
    difference(){
      translate([-2, -2, -3]) cube([50, 30, 2]);
      translate([0, 0, -3]) cube([46, 26, 14]);
    } // difference
  } // union
}

difference(){
  resize(newsize=[75, 50, 27.5]) union(){
    cylinder(d=75, h=2);
    difference(){
      sphere(d=75);
      union(){
        sphere(d=72);
        translate([0, 0, 2-75/2]) cube(75, center=true);
      } // union
    } // difference
  } // union
  union(){
    Box();
    translate([0, -19, 1]) rotate([180, 0, 0]) linear_extrude(height = 1) {
      text("W.A. ten Brink",
      size = 4,
      font = "Lucida Console Regular",
      halign = "center",
      valign = "center"
    );
    } // text
  } // union
}
This time I did not create a separate method for the texts simply because I use only two texts of different sizes. Creating a module for that would require an additional parameter and the text function isn’t that complex.
I first create the box including a border and make it look a bit pretty. I make sure that the box-part that needs to be subtracted aligns to the center of the X-Y plane and lies against the zero Z plane. The border will stick out anyways but it allows me an easier way to put it in the proper place. Because of this, I don’t need to translate the position of the box.
Please, do notice that the text on the box is offset at 1/10th of a millimeter because else a thin piece of those numbers will become part of the rendering! Those would become loose parts so I need to add an offset. This is something you have to do when you do into the negative parts. I should actually do the same for the border but actually like the small line that it adds. It won’t be really noticeable when printed, though. But in the 3D software it will be visible as a thin line.
The dimensions of this box are 75x50x27.5 mm which is a bit large. Then again, the device itself isn’t that small either.
Like the ruler, I uploaded this model to Shapeways to get an estimate of the price and looks. It has slightly more volume as my ruler but the price is more than double of my ruler! The reason for this is because the price for plastic is determined by the volume of the model and the machine space that it takes. And although my ruler was long, it was also thin and not so high, thus it did not need as much space as this model.
In my next post I will combine this model with my model Anarani. In that post, I will also create the platform for Anarani to stand upon, although that won’t be very special.
