If you ever visited the Stratego site, and when you’re as old as I am, then this site will bring back nice memories from the past. (You did play the board game, didn’t you?) And now, you can play against other players online in a very good version of this not-that-old Dutch game! (Yeah, someone in the Netherland came up with the concept somewhere around the second World War.) (Who do we Dutch people call it the second one, while we’ve never been part of the first World War?)
Anyway, great game! You should play it sometimes. But let me offer some helpful tips to help you win the game…
First of all, the board has 10 rows with ten columns. There’s no real numbering for all the fields, though, but from the starting player’s perspective, I will number the rows from 1 to 10 and the columns from left to right A to J. So A1 is the bottom-left corner for the starting player and the top-right for the opponent.
The fields C5, C6, D5, D6, G5, G6, H5 and H6 cannot be used, thus the play area is literally divided into three strategic areas. A left flank, a right flank and the center. And the trick is to get control over these lanes, making sure your opponent can’t get past, while you yourself can move into the enemy’s territory. This is not that easy, though, since both players start at equal strength. So, you need to capture the most valuable pieces of your opponent without losing your own valuable pieces.
Most people consider the Marshall to be the most valuable piece. Actually, it’s not. It’s so powerful that you would like to use it for offensive purposes but the only piece stronger than the Marshall is the Spy, and the Spy is a pure defensive piece. Once one of your pieces has been taken by the Marshall, you can easily remember where it is and how it walks around the board, thus avoiding it with your General. Basically, your General is more practical to use for offensive purposes once you know where your enemy keeps his Marshall. Better keep your Marshall hidden in the beginning so your opponent cannot use the full force of his General.
After the General you have the two Colonels. But to keep them safe, you will also need to track the enemies General. Keeping track of two pieces is a bit difficult for some. But try to capture the Colonels of your opponent and they will offer you a lot of strength.
Next is the Major, and you have three of those. Keep them in reserve for when you’ve lost the more powerful pieces. You should still try to capture your opponents Majors, though. Because once the strongest pieces have been traded and taken from the board, these majors can help you close the lanes that your enemy uses to get into your territory.
The Captain and Lieutenant are less powerful and can be used to scout the territory of your enemy. They will often be taken by stronger pieces and hopefully a Colonel or General will take them. Which is great, since it’s a good thing to remember where your enemy keeps those pieces. Still, be careful not to lose your Lieutenant to a Captain since knowing where the Captains are is less valuable than knowing where your enemy keeps his General. You have four of both, which you should divide evenly on your flanks.
The Sergeant is most practical to keep behind bombs, since they are stronger than the Miners that are used to defuse bombs. If you manage to capture all five enemy Miners then your flag is safe if it’s behind bombs. Otherwise, your enemy has to take more risks into guessing which non-moving pieces are bombs or flags. Still, with four Sergeants and five Miners, you will have to capture some enemy Miners with your other pieces.
Your often advised to keep your eight scouts in the front. This isn’t always a good idea, since your opponent will also keep scouts in the front, thus all you’d be doing is exchange your scout with those of the enemy. Most scouts are on suicide missions anyways, so better use them to retrieve more valuable information. Since a scout can only win from a Spy, they’re great to keep in the back to check where your enemy keeps their Spy. Because if you take away the Spy from your enemy, your Marshall will be the strongest offensive piece on the board.
And where to keep your Spy? Most players will keep their Spy near their General. That way, if the enemy gets closer with his Marshall, your Spy can defend your General. But often it’s also practical to keep your Spy in one place, not moving it until some of the major pieces are off the board. Also, if you manage to capture a Colonel or General from your enemy, you can exchange your Marshall with the Marshall of your enemy, thus making you more powerful.
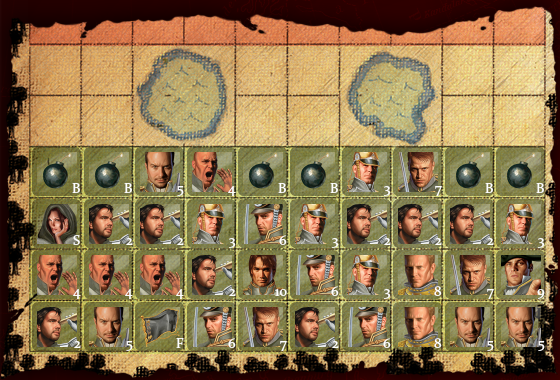
And then we have Bombs. Nothing can defeat a Bomb, except for a Miner. Put them around your Flag, make sure your enemy has no Miners and your opponent will now be unable to win, unless he manages to take all your pieces. Or until you cannot move anymore, because your pieces are locked behind Bombs. For example, the following setup will make you lose before you start:
I’ve occasionally seen players use bombs to block one of the three lanes on the board. Often the right or left flank. Is this a wise strategy? Most players who used this against me just lost, because I then focus on the two open lanes, knowing my opponent is unable to use this third lane. But if I need it, I can easily open it by sacrificing a Miner against it. (Which will be taken by a stronger piece behind it, but okay… I have the new lane through which I can move my strongest pieces, if need be.
I’ve often found bombs to be a nuisance for myself, simply because they block my movement. You can’t destroy your own bombs, nor can you move them to a better place. So I prefer them to be on the first two lines, with an occasional bomb on the third line, preferably in the C, D, G or H column. (Where scouts are less likely to discover them.) The fourth line is better used to move my pieces around. (Although an occasional bomb in the fourth row might surprise your enemy.
And where to put your flag? If you put it in a corner, you can defend it with two bombs. You can then put three Sergeants around the bombs and add a second layer of four bombs around the Sergeants. This way, your opponent will at least lose one Miner in trying to capture your flag. Thus, if you’ve already captured four other Miners, your flag will be safe. But it does have some drawbacks, since your opponent will realise how you’ve set up these bombs, thus he knows he can take anything else that’s on the board. If he knows where your Marshall is, his General will make a real killing among your pieces. And when you’ve traded Generals, he will do the same with his Colonels, followed by his Majors. And if he managed to take away enough of your pieces, you might end up with a strong Marshall and a bunch of scouts, Miners and Sergeants. Not practical when your opponent still has a bunch of Captains and Lieutenants…
Keeping your flag on the first line is still the most practical, since it allows you the best defense for its position, even though you have to put three Bombs around it. But you could put the other bombs in other locations, thus hoping your enemy walks into them with his Major or maybe even his General. This tends to happen with some overconfident opponents who let their General walk around the enemy. (Which tends to happen when they know where your Marshall is.)
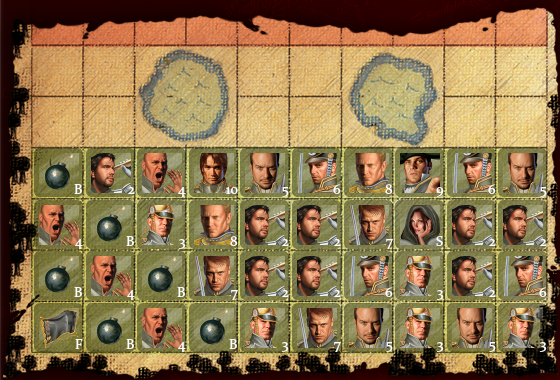
The above example can be strong, because your flag is protected by two layers of bombs. It will likely cost your enemy two scouts before he sees the pattern. He might send two or three miners to clean them up, yet losing them in the process. If the flag is still behind those bombs and you manage to capture the remaining miners, then your opponent will have to take all your moving pieces to win.
But the left flank is actually weak since he could put a General and a Spy next to the bomb once he knows where your Marshall is. Then almost nothing can get past, unless you’re willing to exchange Generals. Then he can use a Colonel to block the passage, still knowing that the Spy will keep your Marshall away. You will have to focus on the other two lanes instead but if you weaken this left flank, then his General will enter your area through this opening while your strongest pieces are on the other side. Sending in the Miners to clean up is then quite easy, accompanied by a Captain to take away the Sergeants. Or just keep the General in that area while the other pieces hunt down your strongest pieces. It’s a pattern that has been used often enough so players will be more likely to walk around with Colonels on your first and second row, while their Marshall and General will keep yours in check.
In general, you will need enough space for your pieces to move around. This setup, although it is reasonable strong, will take away this freedom of movement once your pieces become less powerful than those of your opponent. (For example, because you lost a Major or Colonel.) This setup only works for as long as you’re at least as strong as your opponent.
Of course, there are two things you should try to do. First of all, try to become more powerful than your opponent by hunting down his General, Colonels or Majors. This way, your strongest pieces can block the lanes that your opponents want to use. And if your opponent blocked one lane with Bombs, he will surely regret it now. But remember that most players will keep the Spy near their General, thus you have to be careful when you hunt down this General with your Marshall.
Once you’ve taken a bunch of enemy Scouts, you should consider walking around with your Spy, and especially move it away from the Marshall of your enemy. I’ve had several occasions where I would move my Colonel or General together with my Spy away from the enemies Marshall. The enemy would then follow think I’m walking around with a Miner to clear away Bombs. So, in several locations, the enemy put his Marshall between my Spy and my General, making me choose which one to lose, but ending up very frustrated instead once my Spy slays his Marshall. (Which gets a very nice animation in this game!)
In one situation I even manage to get the enemies Marshall this way and immediately took the General of my enemy with my Marshall, knowing it was protected by a Spy. Why? Because now my strongest piece is the General, while my opponent only has a Colonel. Otherwise, that Spy would still be able to take down my Marshall if all other pieces are traded equally.
Still, having the strongest pieces isn’t enough. In one game, I knew where the enemy kept his flag and it was exposed from three sides. I had a General and Two Sergeants, but my flag was surrounded by bombs. My enemy had a Marshall and one Colonel, so all he had to do was capture my pieces and he would still win. Unfortunately, since my General was more powerful than his Colonel, he had to protect one side with his Marshall. My two Sergeants could approach the flag from the two other sides and his Colonel could only protect one side. So in the end, my last piece took his flag and I won with one Sergeant against a Marshall and a Colonel!
If your flag isn’t behind bombs, you can lose more easily. But if your flag is behind bombs, your enemy will know where to look and send down his Miners. A Marshall can’t win from two Miners even if the flag is behind bombs, simply because the Miners will walk through all those bombs. This is why it’s important to take all Miners your enemy has. Which is even true if your flag is in the open, since it forces your opponent to be more careful.
It is a good idea to keep your forces divided over both flanks. One Colonel on the left and one on the right. The Majors close to every lane, the Captains and Lieutenants in the front in the hopes of exposing your enemies strongest pieces and your scouts ready to scout once the first row is cleared up a bit. Miners in the back, preferably in a pattern that would suggest a layout of bombs. And your Marshall and General on both sides next to the central lane, close to the fourth line so they can block the center or one of the side fronts.
Also, keep in mind that if you know where your enemy keeps his Marshall, moving pieces towards him often suggests that you’re sending your Spy to capture him. Or your Marshall for an exchange. Use this in your advantage by faking these kinds of movements, or by moving your Spy away from their Marshall.
Also, keep in mind that when you’ve captured a Colonel or Major, it is time to exchange all pieces so you will have the strongest piece on board. Make good use of that advantage and it will increase your chances of winning.
