A long time ago, I designed my own board using an ATTiny85, a 74HC595, two buttons and 14 LEDs to create a simple board with 2 6-sided dice. Pressing a button would roll one of the dice. It was fun, but I forgot about that project until I decided to redo it again. And this time, I designed a new, round board that would use capacitive buttons. And the result? This video, this design, this Gerber file (zipped) and this picture:
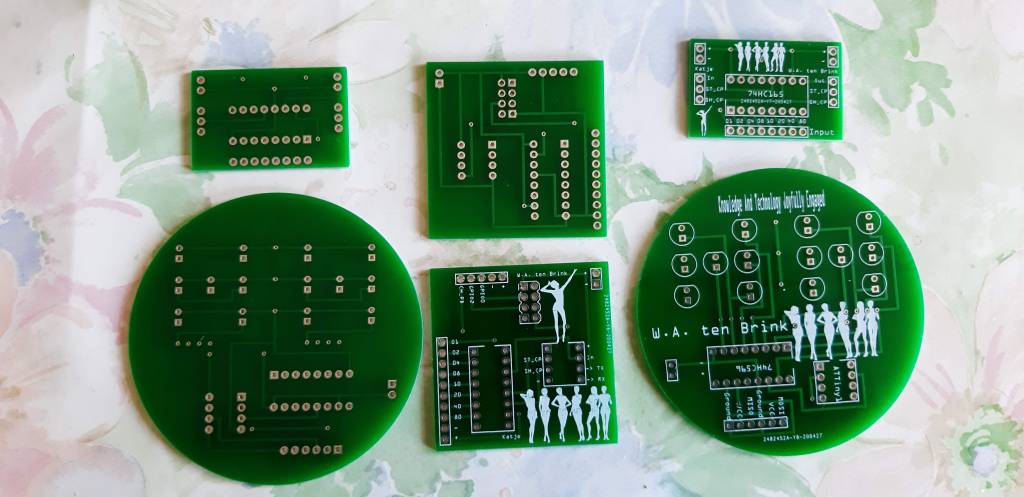
In the above picture you’ll see two round boards, two rectangle boards and two square boards. These are some boards that I’ve been working on.
The rectangular board supports an 74HC165 IC, which is an input shift register. I have a similar board for an output shift register. Basically, the 165 reads voltages (High or Low) from 8 pins to translate them to bits in a byte. The 595 translates bits in a byte back to voltages. Having this on a special board is just practical.
The square board combines the 74HC595 shift register with an ATTiny processor, which is linked again to an ESP8266 module. (The ESP-01.) This basically makes a multi-processing board where the ATTiny can handle various LEDs while the ESP sends commands to the ATTiny based on input from the Internet. And the ESP still has 3 pins available for other input or output. But this board is for a later post…
It’s the round board that matters, though. This is what you need to roll two dice. And it has three major parts. The first part is the design of the board. The second part is choice of hardware. The third part is the code to roll dice.
Design
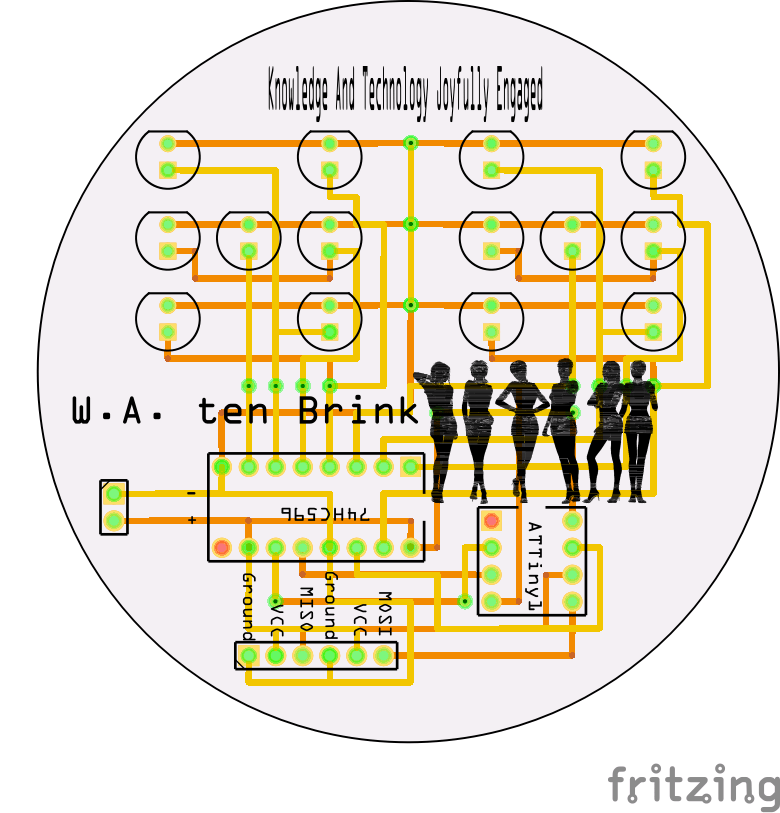
Well, the design is reasonably simple. Power is on the left and the yellow lines are on the top while the orange lines are on the bottom. The 74HC595 has 4 pins per die so with 8 pins I can handle 2 dice. If I want more dice then I would need to chain more of these 595 IC’s. On the right is the 8-pin ATTiny and pins 0 and 1 go to the bottom, allowing communications with “something else”. Three other pins are needed to control the 595. And then there are 14 LEDs consisting of 6 pairs and 2 loose LEDs, resulting in just 4 combinations for every die. Which is exactly what I need.
Hardware
Now, for the hardware I have many options. For my first board, I decided to use an ATTiny13 as this processor is very limited in it’s options. It only has a kilobyte of RAM! And in a time where computers have lots of gigabytes of RAM, a single kilobyte is just unimaginable. It’s slightly more than a thousand characters so this post is likely to be bigger than this RAM can handle. But to roll dice, you don’t need much code…
For the LEDs I’ve picked purple-UV LEDs just for fun. These are pretty clear in the day yet not too bright. And in the dark they provide a blacklight-effect. I did not add any resistors as the whole setup doesn’t use that much power to begin with. These LEDs can handle the voltage.
As for input, I decided to add two capacitive buttons. These will already respond when your finger is near the button so you don’t have to touch them. Which is interesting as I’m planning to cast the LEDs and buttons in resin to give it a smooth surface.
Code
And then the code for all of this. I still needed 105 lines of code but that’s mostly because I use a lot of ‘define’ statements and added several comments. This is the code:
#define CLEARLEFT 0b11110000
#define CLEARRIGHT 0b00001111

#define LEFT_2  0b00000001 // LB-RT
#define LEFT_3  0b00000010 // Horizontal
#define LEFT_4  0b00000100 // RB-LT
#define LEFT_1  0b00001000 // Center
#define RIGHT_2 0b00010000 // LB-RT
#define RIGHT_3 0b00100000 // Horizontal
#define RIGHT_4 0b01000000 // RB-LT
#define RIGHT_1 0b10000000 // Center

#define ROLL_L1 LEFT_1
#define ROLL_L2 LEFT_2
#define ROLL_L3 LEFT_1 | LEFT_2
#define ROLL_L4 LEFT_2 | LEFT_4
#define ROLL_L5 LEFT_1 | LEFT_2 | LEFT_4
#define ROLL_L6 LEFT_2 | LEFT_3 | LEFT_4

#define ROLL_R1 RIGHT_1
#define ROLL_R2 RIGHT_2
#define ROLL_R3 RIGHT_1 | RIGHT_2
#define ROLL_R4 RIGHT_2 | RIGHT_4
#define ROLL_R5 RIGHT_1 | RIGHT_2 | RIGHT_4
#define ROLL_R6 RIGHT_2 | RIGHT_3 | RIGHT_4

// Value of (last) roll.
int left = 0;
int right = 0;
// Pin for left button.
int leftPin = 0;
// Pin for right button
int rightPin = 1;
//Pin connected to data pin of 74HC595
int dataPin = 2;
//Pin connected to clock of 74HC595
int clockPin = 3;
//Pin connected to latch pin of 74HC595
int latchPin = 4;

int LeftValue(int value) {
  switch (value) {
    case 1: return ROLL_L1;
    case 2: return ROLL_L2;
    case 3: return ROLL_L3;
    case 4: return ROLL_L4;
    case 5: return ROLL_L5;
    case 6: return ROLL_L6;
  }
  return 0;
}

int RightValue(int value) {
  switch (value) {
    case 1: return ROLL_R1;
    case 2: return ROLL_R2;
    case 3: return ROLL_R3;
    case 4: return ROLL_R4;
    case 5: return ROLL_R5;
    case 6: return ROLL_R6;
  }
  return 0;
}

void WriteDice() {
  int lastRollValue = 0;
  if (left > 0 && left < 7) lastRollValue = (lastRollValue & CLEARLEFT) | LeftValue(left);
  if (right > 0 && right < 7) lastRollValue = (lastRollValue & CLEARRIGHT) | RightValue(right);
  // Avoid flickering LEDs, disable LEDs.
  digitalWrite(latchPin, LOW);
  // Send out the byte value.
  shiftOut(dataPin, clockPin, MSBFIRST, lastRollValue);
  // Avoid flickering LEDs, enable LEDS.
  digitalWrite(latchPin, HIGH);
}

void setup() {
  randomSeed(millis());
  pinMode(dataPin, OUTPUT);
  pinMode(latchPin, OUTPUT);
  pinMode(clockPin, OUTPUT);
  digitalWrite(latchPin, HIGH);
  for (left = 1; left <= 6; left++) {
    for (right = 1; right <= 6; right++) {
      WriteDice();
      delay(10);
    }
  }
  left = 1;
  right = 1;
  WriteDice();
}

int Roll() {
  return random(1, 7);
}

void loop() {
  // Check if we're pressing a button. If so, update time!
  if (digitalRead(leftPin) == HIGH) left = Roll();
  if (digitalRead(rightPin) == HIGH) right = Roll();
  // Display the rolled results.
  WriteDice();
  delay(50);
}
I start by defining the left and right sides. Left are the 4 bits on the right and right are the 4 bits on the left. Meh. I should have thought about that before…
I then define the four channels that each die has. These four channels per die allow me to define the combinations needed to display the values 1 through 6.
All these defines will translate to hardcoded values so that saves a few bytes in variables. But I do need a few global variables, though. I need variables for the pins and I need variables to remember the values of the left and right die. Well, I could have used “define” for the pin values but I seem to prefer to use variables for pins. Not sure why, exactly.
Two functions called LeftValue() and RightValue() are used to translate a number between 1 and 6 to the proper bit-pattern. All other values will result in 0.
The WriteDice() function will handle sending the dice values to the LEDs using the 595. It’s not too complex. Calculate the proper byte value to hold both dice and then send it to the 595. (Turning off the latch so it won’t flicker.)
The setup() function is also a simple one, but I want to show the dice are working during start-up. That’s why I loop through all possible combinations before displaying snake-eyes.
A simple Roll() method returns random values between 1 and 6 so that’s where dice are rolled.
The Loop() function is just checking if any of the input pins is getting a signal. If the voltage is high, it will roll for that die. If low then the old value remains. As this is inside a loop, it will just keep rolling for as long as the voltage is high.
I used touch buttons as input so as long as you keep your finger on it or close above it, it will just keep rolling. Which gives an interesting effect. This is done on purpose, allowing a player to “shake” the dice for a while. But instead of these buttons I could also have chosen another form of input. Even more interesting, I could have set up serial communication over these two pins with another board, allowing a secondary device to control the rolls.
So, I could attack an ESP-01 to it and let the rolls be made over WiFi, sending the results back to some web server. This is where my other board with the ESP-01 and the ATTiny could be used.
Conclusion
It is a bit challenging to come up with a simple idea like this. Especially when you’re still not very experienced in electronics. The use of the ATTiny13 was very challenging because it is so limited in memory. The ATTiny85 has 8 kilobytes of RAM, which is more practical. Still not a lot, but enough for many simple purposes.
The whole device works on a 3.6 volts battery but I want to cast the whole thing into opaque resin just to make it look more interesting. But I’m also considering making another one that is connected to an ESP-01 so it has WiFi capabilities. (The IC’s and ESP won’t be cast inside the resin, though!)
Once it’s finished I should be able to connect it to a battery or USB port or some other power source, which will make sure the voltage doesn’t exceed the 3.6 volts.
The use of raw ATTiny processors is very interesting because of it’s limitations. For a software developer, these IC’s are really interesting as you need to optimise for size, while keeping speed high. You’re thinking more in clock cycles and bits. It’s a huge difference compared to designing a whole website with database backend where the amount of executables is easily megabytes in size while data can exceed gigabytes of disk space. Good developers can think small and big.
