As you might know, I’m a software engineer. Senior, even. Creating software isn’t just my daily work, it’s also my most favorite hobby, and I invest a lot in my own personal knowledge. I’ve been using a legal Delphi version since 1995 when Delphi 1 was marketed. Before that, I owned a Borland Pascal 7 compiler, allowing me to write both MS-DOS and Windows applications. (End before that, I owned Turbo Pascal 6.) The same with Visual Studio, which I owned myself since the first .NET version was sold. I did skip version 2005, but purchased the 2008, 2010 and the latest 2012 versions, just to keep up with the latest techniques. I also have a license for SQL Server Developer and I use Altova’s Mission kit on a regular basis too to create XML schema’s and to process XML files by using style sheets.
But all this is just working inside the box. You do something on the computer and when people ask me what I do, I have to turn on my computer or laptop, start whatever I’ve created that I can show and once the demonstration is done, I can close it all up again. And after many years, I’ve decided that I need to work “outside the box” too! I need something I can show without the need of my computer, but it should still work together with my computer. And thus I arrived at the Arduino and the Raspberry Pi.
So, let’s start with the Raspberry Pi:

Basically, it’s just a mini-computer which you can use to run Linux. And by using Linux, you could create all kinds of applications by programming them in C++, Python, PHP or any other development system that is available for Linux, and which can be ported to the Raspberry Pi. (Because it uses an ARM processor, which you can also use for mobile phones and cheap tablets.)
But when you look at the little board above, you will notice it has a bunch of pins available, which you can use to connect all kinds of hardware to this little board. And no, it already has a port for USB devices and a HDMI connector and even has a SD card reader so that’s not the kind of hardware that you need to connect. So, what kind of hardware can you connect?
Actually, anything you like! But you will have to be aware of the programming to send signals to the connected hardware and make sure you use the right voltages, else your hardware might burn up. You could, for example, connect a LED light to two of the pins and send a signal to one of those pins every second for half a second. You would then end up with a flashing light.
However, the 3.3 volts the Arduino provides is a bit much for a LED light so chances are that it will break with a final flash. So you need to take more precautions and add a resistor to the setup to lower the voltage. And maybe you want to do more than just create a flashing light. You could add a switch button to turn it on and off manually. Or maybe add a light sensor so it only turns on when it gets dark. Maybe you want to create a warning signal, telling you when your computer overheat by adding a thermometer circuit to your setup. And maybe add a motor and some wheels so your computer can drive around.
But to do all that, you would need something to create your electronics on. A printboard would be nice, but would require soldering, thus you can’t re-use any parts once you’ve used them. Thus you could use software like Fritzing to first create your electronic designs, which you can then put on a broadboard with all more components:

yeah, that’s plug&play. 🙂 On the top left you see three light sensors. Next to it a bunch of resistors and a collection of LED lights. On the bottom the broadboard which you can use to plug them all together. And you’ll probably want a bunch of other electronic parts like condensators, wires, buttons and a lot more. All inexpensive parts that you can buy in the average electronics store. (And often used with model trains…)
So, you can use the Raspberry Pi to create your own light system, but isn’t it a bit overkill to use a whole computer just to switch on a light? Yeah, sure. Which is why the Arduino board happens to be a nice, and less expensive alternative:

On the right you’ll see the Arduino Uno, which is a programmable board with just a little memory and a bunch of holes that you can use to connect your hardware. The Raspberry Pi has pins, but the Arduino has holes, which makes it easier to plug in wires.
On the left, a special Ethernet shield, which happens to have lots of pins in the bottom to connect to the Arduino board. It’s basically an extension to connect your Arduino to the Internet, so it could, for example, send or receive commands from any computer. And this is what makes the whole device very interesting! You can “talk” to it over an Internet connection.
However, to make the shield and board work together, it needs to use some of the pins that you might want to use for your own experiments instead. So there’s an Arduino board with a build-in ethernet connection:
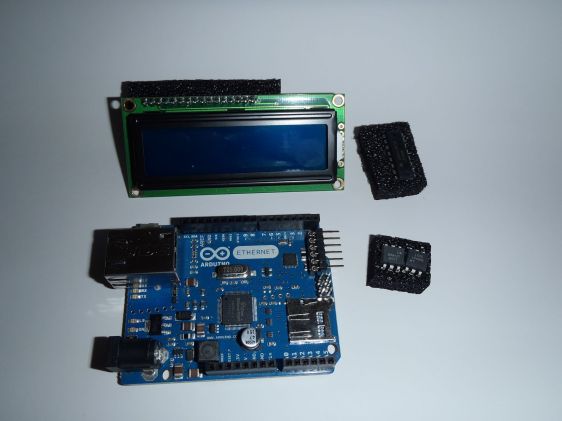
And yes, above the board you’ll see a LCD screen that you could use to display messages. You also see an IC that can be used for some simple processing of your signals that you’ll be sending over the wires. And two optocouplers that can be used to isolate two systems with different voltages, yet allowing signals to be sent between them.
The Ethernet board does lack a USB connection, though. Then again, if you want to create your own internet-enabled electronic device then this is just more than enough as the foundation of your project.
There are also several other types of Arduino boards, each with their own special properties. I don’t have those yet, though.
The Arduino is very useful for projects that don’t need a lot of coding. Otherwise, the Raspberry Pi would be a better solution. The Raspberry Pi can, for example, be used as a web server, allowing you to send much more complex signals than the Arduino can handle. Plus, you can connect a monitor, keyboard, mouse, hard disk and other devices to your setup, like this interesting monitor:
And yes, it could be possible to use this monitor from an Arduino board but the amount of programming you’d need would be huge, and the amount of memory the Arduino has would not allow you to do something complicated. So, if you want to create a photo frame with a special remote, the Raspberry Pi would be more practical. If you want to set the lights on your model train station based on the amount of light outside, the Arduino would be better.
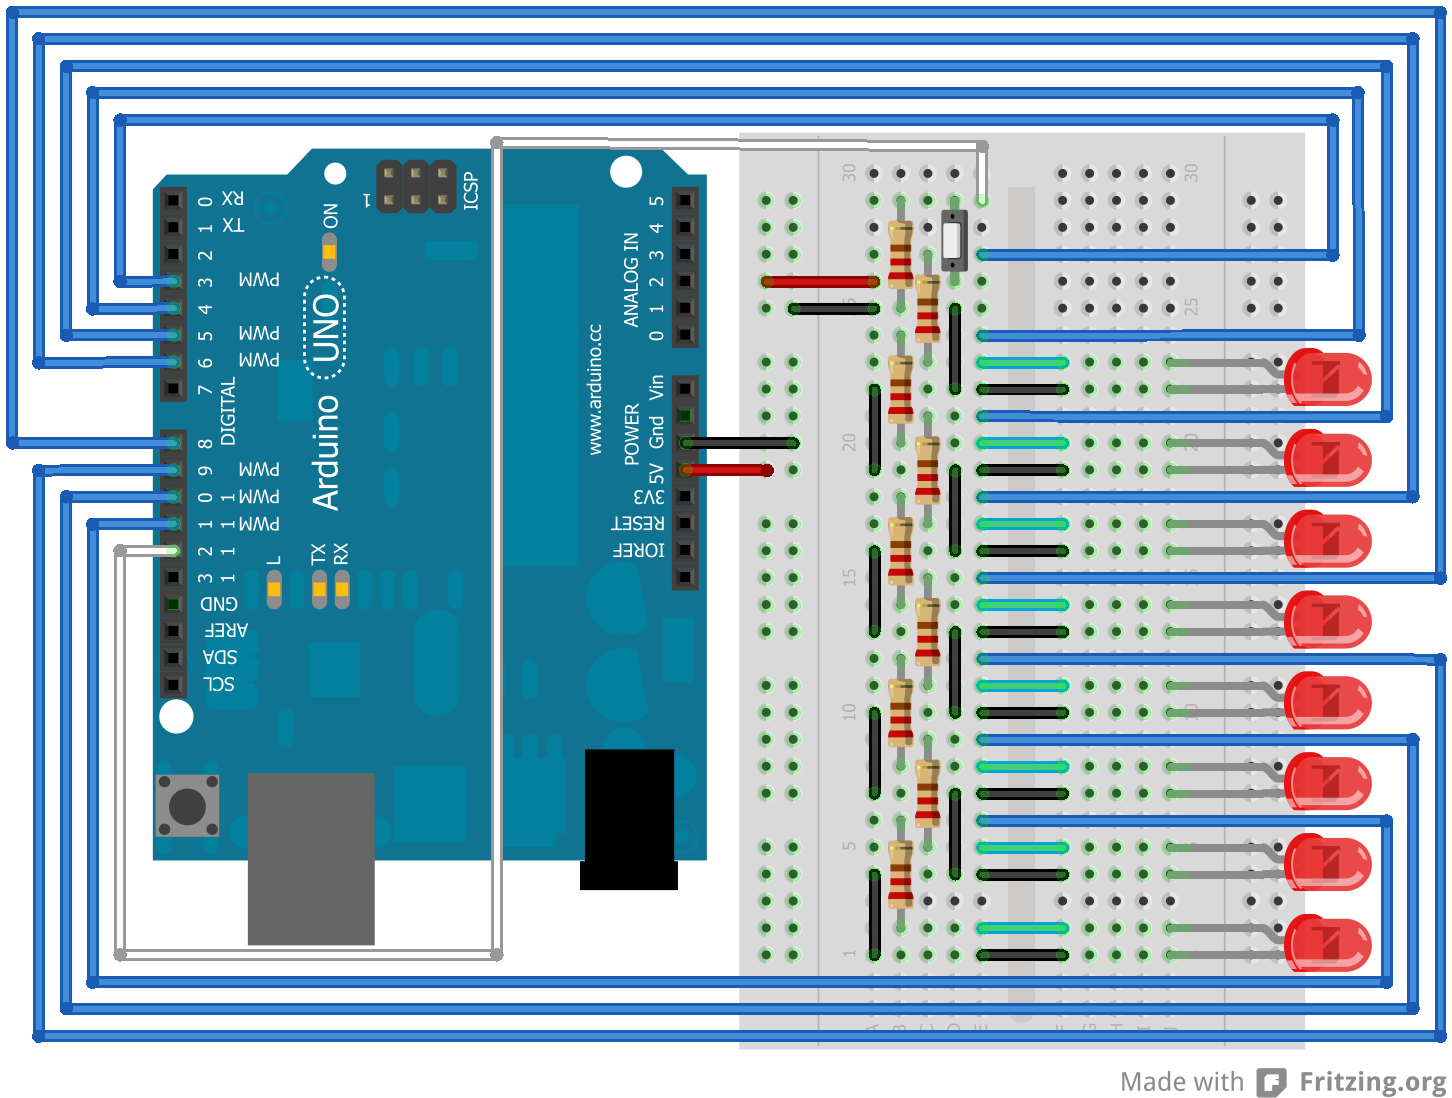
The Arduino has another advantage, although the Raspberry could make use of that option too. The Fritzing software allows you to design something and show what it would look like on a board. Say, for example, that I want to manage eight LED lights by using a switch. For example, a binary counter which displays it’s current value as a byte value. As an electronic schema it would look something like this:
In the above schema I use nine pins from the Arduino to handle all lights and the switch. And yes, I could have used just one if I added an IC and some additional components but I want to keep this extremely simple. Besides, using an IC means that I would have to use serial communication between the Arduino and the board, while I want this project to do things parallel.
But above schema is interesting but you might want to build it so you can test if it works. You should also build it so you can test the code for the Arduino which should do some action based on pressing the button. This has not been defined by me so I could use this all, for example, with an Ethernet board and have a computer send or receive a byte value to the board when I press the button.
Anyways, the Fritzing software can display me what the board would like, although I did show all wires reasonably neat around the board:
But once my design is finished, I don’t want to lock up my broadboard just for this project. I might want to create another thing next, thus I would need my board and my components. So, the solution would be to have a circuit board printer for just this project, which would look something like this:

A simple design, which fits a single side of a board, allowing me to add the components that I used on the broadboard before. A bit of soldering, adding a few pins to connect it to the Arduino board and I would end up with an interesting device, which still needs some code to operate the lights. But hey, this is the hardware side, allowing me to show something outside the box!
The next step would be writing the code for the Arduino itself, which should turn on or off some of the lights based on certain conditions. And it must respond to a button press. But what this project is going to be, I don’t know yet. A connection with a web server, having some kind of communication between my board and the web server would be something interesting to show. It would allow me to go back to the box, design something and then show the result on my Arduino board, which could be build in some black box with just the LED lights and the switch visible.
Too bad it would still need a cable to my router, but there are possible alternatives. For example, there’s also a WiFi-based option, or something with Bluetooth. Or perhaps even with a GPS module and then sending SMS messages. There are a lot of options for me to work outside the box with just these components!
By the way, since the Raspberry Pi has a build-in USB connector, I could just use a WiFi USB dongle instead of the Internet cable to make it a wireless device…
